Base stats:
– BTU: 5,300 (LPG vapor)
– BTU: 10,300 (LPG liquid-inverted)
– BTU: 9,500 (White gas)
– BTU: 7,300 (Kerosene)
– Weight: 11.5 oz min, 19.4 oz packed
– Stove comparison review
The short: If you’re looking for a liquid fuel stove, and are willing to compromise on a little weight and size to get better reliability, the MSR Whisperlite Universal is hard to beat. It is the goto choice for many experienced backpackers who need reliability in the field.
The Whisperlite series is special for three basic reasons:
– It is a naturally quiet liquid fuel stove (relatively speaking)
– It is built for reliability (i.e. works with dirty fuels)
– For a liquid fuel stove, it is very easy to maintain (i.e. requires no spindle care)
I’ve been a fan of MSR fuel stoves for some time.
MSR has been in the fuel bottle based liquid fuel stove space since day one. Understandable, since this niche sub-industry was invented by Larry Penberthy, founder of MSR, back in 1969, with it’s first fuel bottle liquid fuel stove, the Model No.9, released in 1973. Yowza, talk about history!
The wire-frame Whisperlite has been around since 1982, and the current stamped-steel Whisperlite family was introduced in 2012.
There are three versions of the stamped steel Whisperlite being sold today. The least expensive is the white gas only version. The middle range is the International version which adds the ability to use kerosene (which includes diesel and jet fuel). The Universal is the top of the line and adds LPG capability.
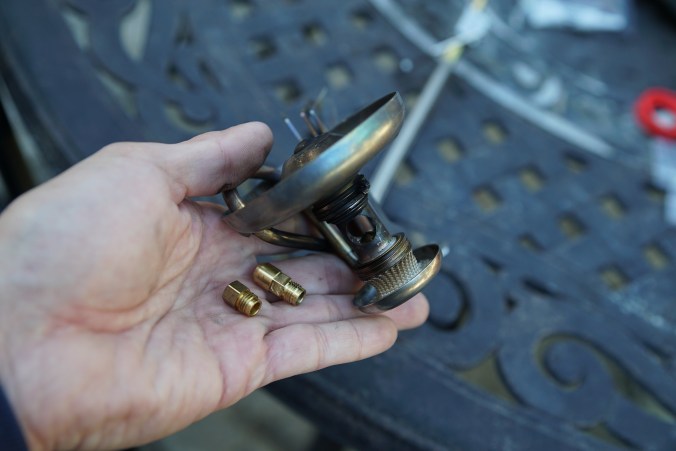
The Universal version is also slightly modified. The connector end of the fuel line is removable and can be replaced with a different connector for LPG gas canisters, and a separate LPG stand is also included to allow the LPG canister to be inverted for liquid fuel mode. There is also a third nozzle that is included with the Universal version.
PACKAGE CONTENTS:
The new bag.


The bag is both better and worse than the previous version (wire-frame Whisperlite). The new bag uses a much thinner nylon. I miss the thicker nylon for durability. But the newer bag has an extra internal pocket, something missing from the previous version. Great addition and helps keep small items (like spare o-rings and nozzles) from getting lost.
Here’s what’s in the bag:
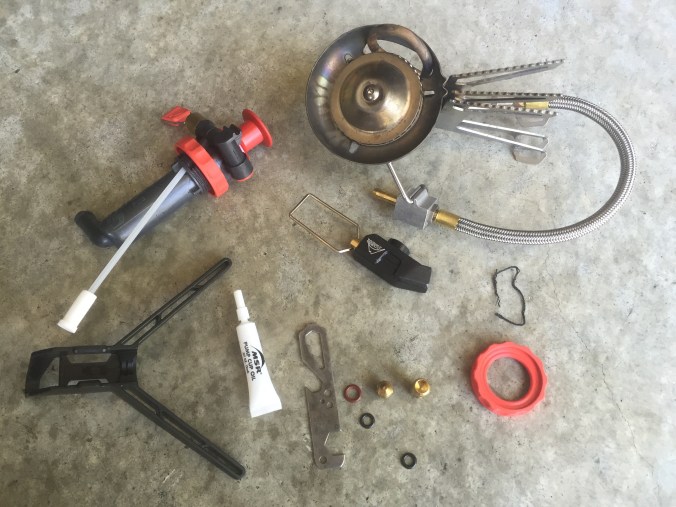
You get
– Pump
– Stove
– Extra connector (for LPG cans)
– LPG stand (to invert LPG cans for liquid fuel)
– Small silicone grease tube
– The standard MSR multitool
– Two spare nozzles: For LPG and Kero
– Three o-rings for the most common breakdowns on the pump
– A spare large orange bottle top pressure seal
There are two items you need to add to this:
– A 1/8′ hex bolt (tiny one would be best)
– A fuel bottle
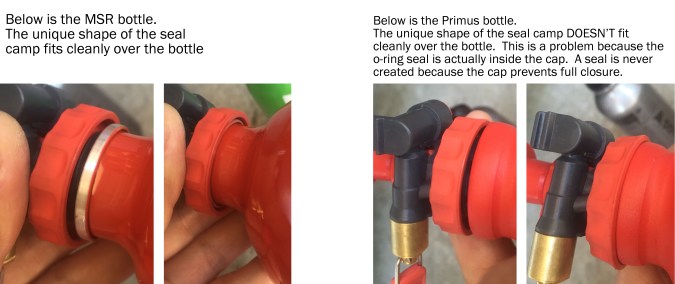
Side bar: Make sure to get an MSR fuel bottle, not Optimus or Primus.
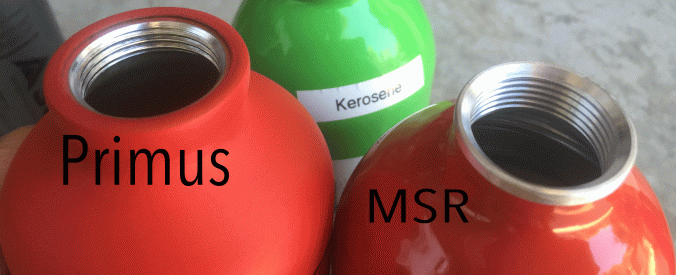
CAUTION: The MSR pump cap does not fit because Primus and Optimus fuel bottles have a wide rim.
THE PUMP AND FUEL CONNECTOR
The MSR pump is ubiquitous across all MSR stoves including the XGK and Dragonfly.
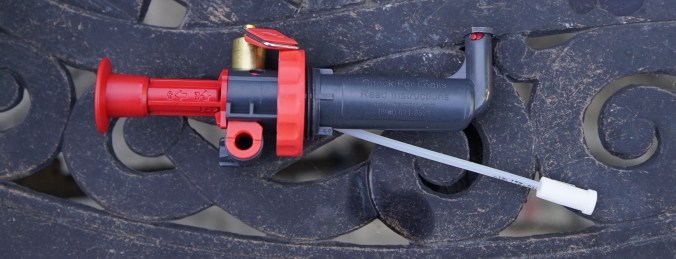
The L-Shaped dark tube is the air pressure pump. The small white tube with the filter tip is the fuel intake, which sends fuel to the red hole. The red plastic pump is a pretty good size and action is reasonably smooth. The brass portion with the red tab throttles the fuel.
Connecting the tube is fairly easy.


While this isn’t official (like it is with other stoves), lying the bottle down one way sends fuel through, and lying it down the other way through sends air through, allowing you to clear the fuel line of fuel, by pushing air all the way to the stove head.
This is because the white plastic fuel intake is angled to hit the side wall of the fuel bottle.


If you’ve read my other reviews of liquid fuel stoves, you’ll know that I’m not a fan of any pump that is:
– L-shaped pump
– Uses a soft plastic intake tube.
The MSR fuel pump is even more problematic. There are so many plastic components. The plastic turns brittle with age and very low temperatures. Being too forceful in throttling or screwing on the cap can easily cause the plastic to fracture, split, and break the seals.
Frankly, considering how amazing MSR stoves are, I’m genuinely surprised that the company continues to use this pump. MSR could easily create a new pump that requires no changes to the fuel line connector (ensuring compatibility with all stoves), that is considerably better than the current version.
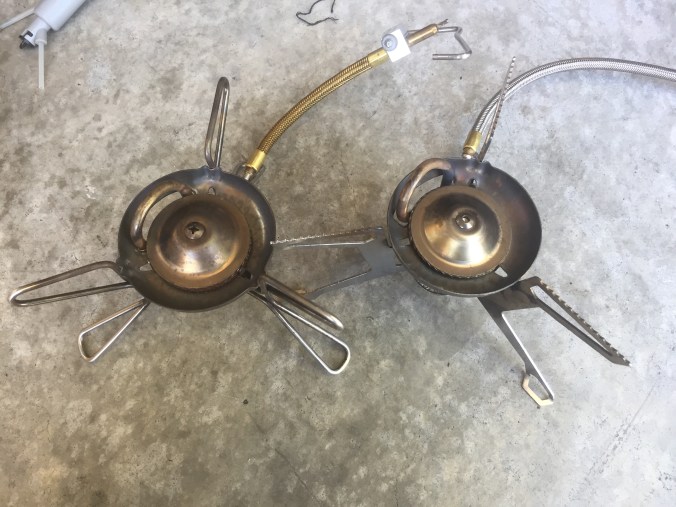
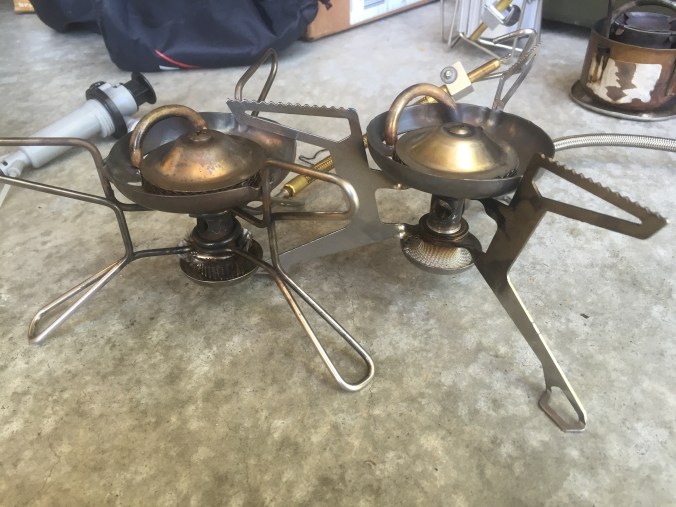
Moving on to the fuel line, let’s start with a comparison to the previous generation wire-frame version:


The new stamped steel version of the Whisperlite uses a larger block, and a smaller locking wire. Also, upon taking a closer look, you can see that at the base of the block on the new Universal version, there is a hex screw bolt that does not exist on the previous version.
This hex bolt is to allow the removal of the fuel line connector piece. Which can then be replaced by the LPG connector:


You can use the multi-tool provided and simply unscrew the hex bolt:


After that, you can connect to regular LPG gas canisters:

The above shows the LPG can in vapor mode.
For liquid mode (burns hotter, ensures performance in cold weather, but also burns through fuel way way faster), you can just flip the can around. But, if you want to use the included inverter stand:


Okay, that covers the fuel line and optional LPG conversion.
THE STOVE
(AND CHANGING THE JETS)
The fuel line ends in the generator coil. For those familiar with traditional stoves, this section is both a blessing and a curse.
From a fuel perspective, generator coils rock, because they are typically wider conduits than newer brass/copper base heating elements, so carbon buildu takes longer.
From a physical durability perspective, generator coils usually suffer, because they are typically made from softer metals like copper or brass in order to facilitate proper heating without changing shape. Very often, you’ll see steel brackets to protect the softer metal generator coil. The WhisperLite has one such bracket hanging off one of the stamped steel legs.


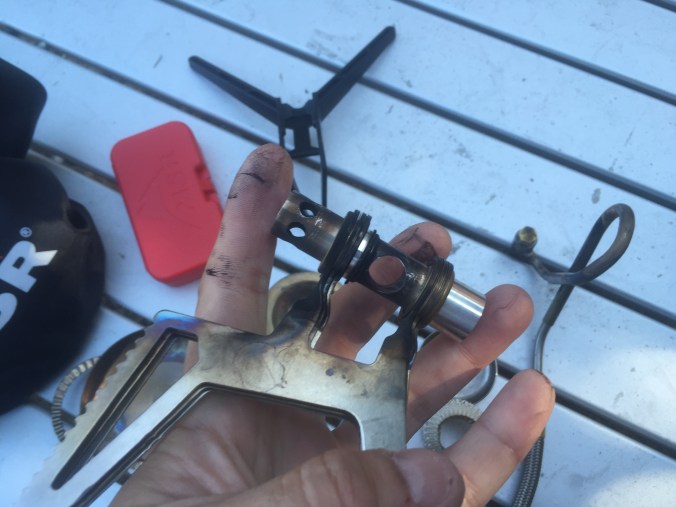
The generator coil runs to the base of the stove, just above the priming pan. It ends in a nozzle (a.k.a. nipple, jet bolt). This bolt is inter-changeable, because different types of fuel run differently depending on the size (or gauge) of the nozzle hole.
The rule of thumb is: The cleaner the fuel, the larger the gauge (hole diameter).
Changing the nozzle is pretty easy:
But be careful. The WhisperLite, like most MSR liquid fuel stoves, has an additional mechanism called the SHAKERJET. This is a tiny needle over a small weighted base that allows you to clear the fuel by shaking the stove up and down. Debris sometimes gets in the holes (or more likely, carbon buildup blocks the hole), requiring some shaking to clear the nozzle.
First, unscrew the primer pan and fuel pad, and then pull out the generator coil:


Next, unscrew the nozzle using the MSR multi-tool, but BE CAREFUL. The shaker jet is easy to lose. It’s not connected to anything, so will fall out. Try this at a campsite and you can easily lose the shakerjet.


Next, select the nozzle you want to use:
– UG: White Gas
– UK: Kerosene
– The taller one: LPG
When putting the replacement bolt in, it’s best to put everything together upside down.
Place the ShakerJet into the nozzle, needle end towards the gauge, flip the generator coil, and screw in the nozzle:


Insert the nozzle end into the stove, while aligning the generator coil to go through the slot in the stove head, and also slotted into the steel bracket, place the priming pad on, and screw the priming pan back on.


That’s basically it.
As mentioned, the ShakerJet is really easy to lose, so be careful when conducting maintenance in the field. I’d definitely not recommend doing this in the dark. I’ve made that mistake once or twice….not a fun 20 minutes looking for the one of the nozzles or the ShakerJet.
USING THE STOVE
Okay, now that the pump is inserted into the fuel bottle (with a good seal), and is connected to the fuel line, it’s time to fire it up.
Super easy.
First, prime the stove. This just takes a minute, and becomes second nature after a few tries. If you’re using white gas (naptha, Coleman fuel), you can pump the fuel bottle a few times (maybe 5-10, more if the bottle is half empty), open on the nozzle for a few seconds to let some of the fuel out, and then close it. After that, just light it.

Let it run for a bit. It’ll start to sizzle. When you hear that, the generator coil is hot enough that it’s vaporizing the fuel in the coil, so open up the throttle again, and you should see a blue flame, quietly hissing, and it should look like this:

If you get a big ball of flame or see a lot of yellow, not to worry. Just close the throttle and let that burn off, and then open up the nozzle again.
If you’re using LPG cans, no priming necessary. Just set it right side up for vapor mode, light it, and if necessary, flip it for higher performance.
For kerosene, k1, klean-heat, diesel, or jet fuel, I’d recommend carrying a small bottle of de-natured alcohol to prime the pan. These fuels have a higher flash point, so aren’t easy to light cold, and also requires longer priming to heat the generator.
FINAL THOUGHTS
So….after all this, what do I think of the stove?
– It simmers better than the MSR XGK (not a simmer king, but usable)
– It is easier to maintain than most stoves
– The stove and fuel line epitomize reliability with dirty fuels
– It is much much quieter than other roarer type liquid fuel stoves.
– The pump is…well…meh
The MSR Whisperlite is an iconic, historic, ubiquitous stove, loved by backpackers the world over, and with good reason. There are really only two choices when venturing out into areas with where only very dirty fuels like bencina, and dirty kerosene is available. There’s the WhisperLite, and the MSR XGK-EX.
If you’re planning to head into remote areas where only dirty fuels are available, there are few better choices.
For the rest of us, who have ready access to clean fuels, the WhisperLite has the added advantage of being among the quieter liquid fuel stoves out there, and will last a lifetime.
HAPPY CAMPING!
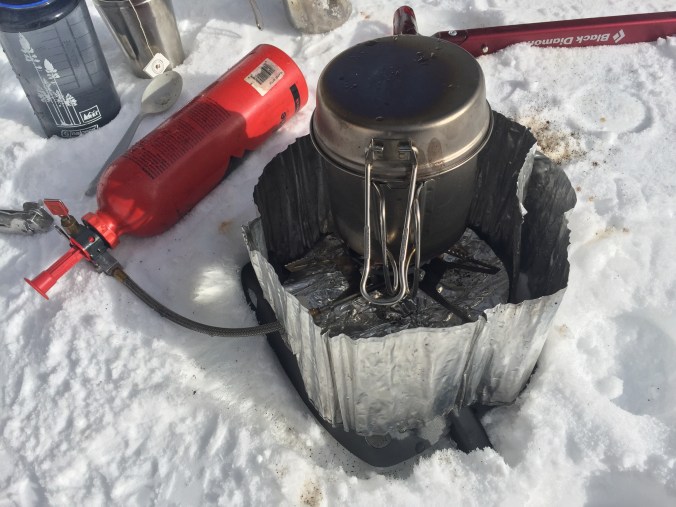
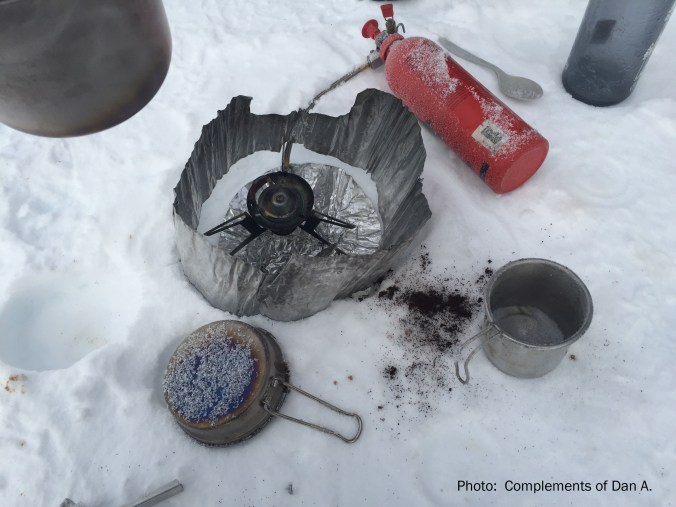
[Snow based photos complements of Dan A.]
ADDENDUM
– Slight custom usage
– Simple Maintenance
– Matching cooksets
ADDENDUM 1: SLIGHT CUSTOM USAGE
These days, I’m using just the LPG connector right now, which allows for liquid fuel by changing the pump to a Primus ErgoPump.
I much prefer the Primus ErgoPump over the MSR fuel pump. This also means leaving the MSR’s traditional fuel connector at home. The MSR LPG fuel connector just stays on all the time now, switching between LPG and liquid fuel without having to change the fuel connector (I still have to change the nozzle, of course)


You see, the Primus ErgoPump is mostly metal, which I like. Also, there is no L-shaped pump, and this allows the fuel intake to metal as well.
Since the fuel intake needs to be near the edge of a bottle wall, the ErgoPump’s bottle screw threads are at an angle. Genius really.

One side pushes fuel through (since the fuel intake would be on the bottom, and the other side pushes air through (since the fuel intake would be at the top).


ADDENDUM 2: SIMPLE MAINTENANCE
In terms of maintenance, the WhisperLite is one of the easiest out there.
You’ve already seen how the generator coil can be removed, but you can also take apart the stove head to clean buildup through the core stem, or the clean the stove head rings.
Remember when I mentioned in the list at the top that you would want a 1/8 hex screw? Well, this is where it comes in handy.

The good news is the multi-tool still comes in handy here.


Once unscrewed, you can remove the stove head cap, rings and wind guard.


Be careful to remember the stacking order of the rings. They alternate between ridged and flat rings, with extra flat rings at the bottom.
Once all these pieces are removed, all that’s really left are the stamped steel legs, and the core stem.
Put another way, this stove is one of the easiest to maintain of any stoves on the market today. You can clean the pieces individually, and run wire to clear clogs fairly easily.
One bizarre sidenote. The older wire-frame WhisperLite used a regular Plus driver. Much easier to remove the stove head. I think they changed it to hex because they didn’t want folks to remove the stove head anymore. Strange….why wouldn’t you when you want to maintain the stove?


ADDENDUM 3: MATCHING COOKSETS
Snow Peak Summit Hybrid: Doesn’t fit, mug barely fits.

GSI Halulite: Not really a good fit.


Snow Peak mini cookset: Not so great. Doesn’t fit in either the smaller or larger of the pots.


Toaks 1300ml and 1600ml: Fits in the larger one, not the smaller one.


Snow Peak Trek: 900ml, 1400ml. Fits in the larger one, not the smaller one.


Optimus HE Cook set: Great for WhisperLite, and does fit, but needs padding to protect non-stick pot.


In case anyone is wondering, it doesn’t really fit in the Optimus HE Weekender.

Excellant review of a really good stove. I keep extra o-rings with my whisperlites since it’s easy to drop one when doing maintenance to the pump. Your right about the pumps being the weakest part of these stoves and it would be nice if they upgraded them to a metal design. I also find that a drop of oil or even lip balm on the end of the fuel line that goes into the pump makes joining the two together much easier, even a bit of spit makes it easier. Always make sure you have your repair kit stocked with replacement parts before heading out with these stoves as sooner or later you’ll need to do field service on them. Customer service with msr is really good, they will go out of their way to help you to the best of their ability with any stove problems or questions about their stoves. I know this first hand as I recently had to get a replacement pump and fuel line for two different stoves.
LikeLiked by 1 person
Thx, and great points
LikeLike
Hi,
Brilliant and in depth review of this stove. I have the same stove and agree with all your points, I have already had 1 pump fail due to the metal on plastic thread inside the fuel adjuster valve.
After reading this I have just gone and got myself a Primus Ergopump to connect to the UC gas canister head. It looks like it should fit perfectly and is the correct size but I cannot get them to thread together, did you have to modify yours in any way or do you have any ideas?
Everything looks identical to your photos.
Cheers!
LikeLiked by 1 person
I didn’t modify my primus ergopump. For me, it just worked. I will double check this weekend
LikeLike
It’s been a few years since I visited your site, glad to see it’s still up. RE using the Primus ErgoPump with MSR fuel bottles– they work fine on the older USA-made bottles, such as the one you have, but the new MSR bottles are made in China and have a different design, where there are at least 4-5 additional internal threads, i.e. the neck is longer, which does not provide clearance for the diagonal pickup tube of the ErgoPump.
LikeLiked by 1 person
Hi, What a great website – thanks! I own an msr whisperlite international, but am a bit annoyed that it requires a larger pot to be able to put it inside (ive got a sea to summit alpha 2.7L pot).
I was considering selling the whole thing and getting an xkg ex instead, as it packs down a lot smaller.
Do you have a preference of one stove over the other?
thanks,
-Josh
LikeLiked by 1 person
The XGK is one of the most durable and low maintenance stoves you can get (except for the pump which you should get a spare or two of).
The one problem with the XGK for me is it’s limited throttle control. It’s hard to find throttle to the flame you like unless you use some tricks, all of which have their cons.
The XGK is ideal if you use a large pot because the stove is strong enough to heat a ton of water. But for 1-2 person use, it’s kind of overkill. It’s also larger and heavier than it looks, being incredibly durable.
The most common “tricks” to adjust heat transfer to pots are: 1. decrease the pressure of in the fuel bottle. While this trick works very very well, there are two problems with it. First the carbon deposits at the juncture between the fuel line and the generator coil builds faster, so you’ll have to take it apart more often to clean it. 2. bringing along a separate stand to put more distance between the flame and the pot, which has different cons including, less fuel efficiency, extra weight (the need to carry the stand), and finally because of the increased distance the potential for even a light breeze to dramatically impact heat control is even greater, so packing an extra wind screen is a good idea.
Having said all that, the pro is that there is absolutely nothing else on the market today that is as durable as the XGK EX. Two come close: The previous generation Primus Omnifuel and the currently selling Optimus Polaris Optifuel.
One solution for the Whisperlite is a diffuser plate (something I pack with the XGK EX and the Whisperlite. Though its main purpose is to spread the heat from the flame over a wider area to limit the central hotspot, its shape allows for the use of smaller cups. And ideal addition to the Whisperlite universal. (you can see a photo of the diffuser plate near the bottom of my XGK EX review.
LikeLike
It fits, for the most part, in the keith titanium ti6015 pot
LikeLike