
I’ve done a fair bit of camping since the last review here, and I’ve purchased and used a few different packs since then.
In that time, I’ve learned a few new things about gear, and what can be done with what kinds of gear.
For the Lastenkraxe, I finally got around to ordering the dedicated packsack for it, and the difference is huge. Before, the Lastenkraxe was, at least for me, the load carrier to use when I had strangely shaped items and I wanted quick access to them. That, coupled with the fact that it always stands straight up, and it was worth bringing on a fairly wide variety of trips. But my system was unwieldy, and even when empty, the system weighed just under 15 lbs. That happens when you attach a complete pack with its own carry system (in my case, the Bergaus Centruio 45 with side pockets) to another pack system…


After a year of using this, and seeing just how useful an external load carrier system can be (to gather firewood or attaching unwieldy items to the system), I really wanted to find a way to drop the weight of the pack system itself, and the easiest way to do that was to get the dedicated packsack for it. A pack system designed specifically for the Lastenkraxe wouldn’t have it’s own carry system, so the added weight of shoulder straps, waist belt, and back padding would be eliminated. There are also custom attachment points. There were two available for the Lastenkraxe, and I wanted the simplest and lightest one possible. They don’t sell in the US. Luckily, A3 Distribution was able to ship internationally.


Now, the pack system weighs 8 lbs empty. While still two lbs heavier than many typical canvas/thick nylon internal frame packs, and about double the weight of modern high-end internal frame packs, the weight decrease is significant enough that I can use the lastenkraxe on a wider variety of trips. In fact, the only type of trip where the lastenkraxe really isn’t a good fit for me is the super short weekend long distance trip, where I’m trying to cover 24+ miles round trip in two days. Other than that, with the flexibility that the Lastenkraxe offers, it a no brainer for any trip that requires a little extra gear (e.g. when bringing the Alpacka Yukon Yak packraft in the summer, or extra clothes in the winter, or larger kitchen kit for groups).
The packsack turns the lastenkraxe into a giant bucket. There are no zipper side pouches, front pouch, or top flap pocket features on the packsack, though they did put a giant pouch along the bottom on the sides and front, the both the top flap is so long in the front they attached molle webbing to the top and front.
If you want the flexibility of a load carrier system, without making it too heavy, the lastenkraxe + packsack is a really great way to go.
Happy camping!
——

I’m fairly new to hiking and backpacking, with just 3 solo backpacking trips, 2 group backpacking trips, some car camping trips, and some day hikes under my belt.
But from the very beginning and a few times since, I tried bad weather camping, and found myself a tad frustrated. In wet weather, my pack would get wet, and post rain, my pack wouldn’t dry, making my pack stink unbearably, and cause discomfort and rashes from chafing of wet material against my back.
This immediately made me start wondering if there was a way to keep my pack off the ground.
Another frustration was the fact that my pack would never stand straight, would tip over, and become extremely dirty, in some cases, so much so that I would not only track dirt into the tent, but debris would catch inside the buckles making them incredibly hard to unlock with cold fingers.
Also, I found that the way I hike and stop, I really wanted some things to be outside my pack to make them easier to get to, but found strapping items to my pack caused some very cumbersome experiences while walking. For instance, in many US parks, there is a requirement to have a bear canister. Most bear canisters will fit inside a large pack but take an inordinate amount of space and are cumbersome to get into.
Finally, I discovered quickly that there were other items that just didn’t make sense to have inside a pack because they got wet or dirty in use and needed to be strapped, but this also proved cumbersome with internal frame packs and still managed to get contents dirty.
Now, internal frames have several advantages, not the least of which is that it’s better at hugging your back and flexing with your body through torsional movement. For climbers, this is not a luxury but a necessity. Thing is, i don’t climb. So an internal frame wasn’t as important to me as it is to many folks out there. Another advantage of internal frame packs is lower weight. But, I’m a distance runner. So my arms may be weak, but my legs are strong and have good stamina, so dropping weight from my legs wasn’t much of a concern, so long as my pack could push the weight to my legs and keep my torso and arms relatively weight free. Internal frames are also lighter than external frame setups, and what’s more, many people prefer to have everything inside the pack, to keep things tight and clean while hiking or climbing. None of those are really concerns for me, so the relative advantages of internal frame packs vs. external frame packs aren’t weighted the same for me vs. a lot of other people.
All of the above frustrations lead me down a series of strange paths and ideas, including purchasing low tables that had built in poles to set my pack on and prevent the pack toppling over. A ridiculous idea to be sure.
Then I came upon external frame packs and found many had shelves. Perfect! But…no. The shelves were all folding shelves which have three main problems. First, they don’t really lock well, so most of them don’t stand. Second, the straps or hinges (depending on make/model) would get in the way of any items that were wider than the shelf itself, and third, because there was no space between the shelf and the floor, they would get gear wet and muddy in wet weather very quickly. There was one that seemed to fit my criteria on a hunting e-commerce site, but unfortunately, it had features I didn’t want specifically designed for hunting, and more importantly, had bad reviews regarding buckling under heavier loads.
I was all set to give up on these issues when i came across the Tatonka Lastenkraxe.
—-
The Lastenkraxe has several distinct advantages for me.
– First, it stands straight. that means setting it down, standing vertically, and getting into and out of gear very easily, sort of like a bucket.
– Second, the shelf is a few inches above the ground, this means that even if set down in wet/muddy weather, wet crud and debris won’t stick to the bottom of the pack. It also means that in super dry weather, where there are lots of dead pine needles and grime on the ground, it won’t stick and track dirt into the tent.
– Third, by attaching a smaller pack to it and having it raised, there would be plenty of space between the shelf and the bottom of the pack so I could put fairly large items, like the bear canister and my fishing kit in that space.
– Fourth, with several attachment points and tie-down d-rings, I could attach a large number of random items to the external frame without causing any undue pressure on the pack itself
– Finally, with the fairly advanced V2 carrying system, the weight settles very well onto my hips, allowing me to use my stronger legs for all the real work and leaving my shoulders and torso much more free of pain than with my internal pack. On this point, many would argue that a better, more expensive internal frame and carry system, for instance the Gregory packs or some other high-end pack, would have alleviated the problem. Maybe. But in my limited experience, getting pressure off my shoulders and onto my hips is easier with a carry system attached to an external frame.
There is one more advantage that I hadn’t though of nor worried about, but like a lot. I can remove items from the external frame and take just the frame to go out and gather firewood. Something that is required when out backpacking. The frame coupled with some rope or strapping material, can hold much more than my two wimpy arms. Even if I had a carry bag of some sort, the external frame is still easier as it keeps my arms from getting too tired too quickly. For some camp sites, you have to walk nearly a mile out just to find firewood because nearby firewood has been used up throughout most of the early season.
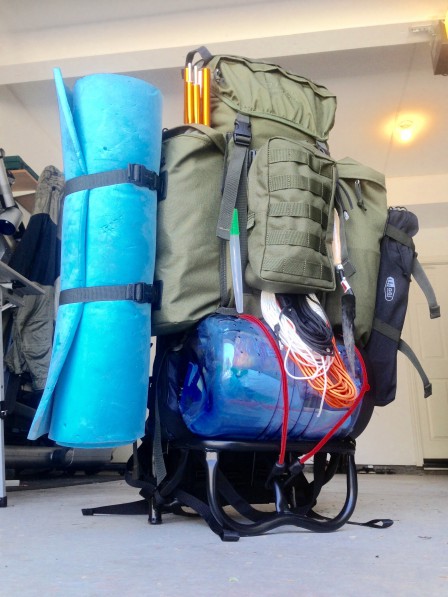
To ensure that I had that shelf space for external gear, I also purchased a 45L Berghaus Centurio 45, and added the two MMPS side pockets. Because this pack has molle webbing, I also purchased a 5.11 molle pouch at the larger 6″ x 10″ size (still waiting for this molle pouch to arrive).
This pack now includes:
– tent, extra tarp, sleeping bag, some spare clothing, a folding bucket, micro-fiber towel, rag, and spare stakes go in main pack pocket
– first aid, stove, cooking gear, water filter, gloves, small lamp, and other camping gear in large side pockets.
– fishing kit and bear canister go below the pack on the shelf, and tied down with bungee cord
– tarp poles go between one side pocket and the main bag
– knife and small hatchet go between the other side pocket and the main bag.
– sleeping pad goes on the ski straps of one pocket
– micro table goes on ski straps of other pocket
– poncho and rain pants go in top cover.
– rope, trowel, extra light go on front webbing.
– In the future, random camp permits and other small gear will go in front molle pouch.
– Solar battery will go in front of front molle pouch
– alpacka pack raft will go above the top cover.
– water bottle, gps, head lamp, and leatherman go on the shoulder straps.
One other small benefit. Because the Berghaus has a frame as well for a stiff back, and because there are bars that push gear away from the back, I found that when attaching the Berghaus to the franme, I had fairly large space in between. Large enough that if I flatten my fairly thick jacket, I can fit it in that space and it has no lumpy or noticeable effect on my back when carrying the entire pack. If I remove the jacket, I think there’s enough space for a good sized bladder, though I’d need to find a simple strapping method for keeping the bladder in place.
Since the bear canister holds food, toiletries, and trash, it all remains fairly easy to get to.
—-
I’ve done a day hike with this pack, and though I didn’t do a lot of uphill downhill hiking, it’s clear that that I can carry more weight than my old gear, and feel less pain when just walking. Even going up and down the stairs proved a fairly easy experience.
in general use, the ease of removing and re-strapping the bear canister seems incredible convenient, and once my tent and sleeping bag is removed, the whole bag cinches down very tight, and the side pockets become sort of like two front pockets, leaving plenty of space for stacking and strapping down firewood.
All in all, I coudn’t be happier with my new setup and am looking forward to truly testing this rig out on an upcoming backpacking trip.
If I remember, I’ll report back and post more pictures.
—-
Here are some great reviews I’ve found from around the web.
– https://apaddleinmypack.wordpress.com/2013/09/10/packframes-tatonka-lastenkraxe-review/
– https://www.youtube.com/watch?v=iKNc57pW1_U
– http://tv-presspass.com/tatonka-lastenkraxe-pack-river-side-video-review/
– http://www.tightlines.co.nz/Resource/Document/2012%20Feb%20NZ%20Outdoor%20Hunting%20Tatonka%20Lastenkraxe%20REVIEW-9307.pdf
– http://survinat.com/2014/07/overview-backpack-tatonka-lastenkraxe-exit-with/

i have one and love it.i wish they made a short one .abit like an alice pack .so it doesnt go higher than shoulders.maybe more pouches or molle .tatonka is quality
LikeLike
Yes, it’s a little tall. And it’s also a little heavy. But it’s hard not to love.
LikeLike